As the leaves begin to turn golden and the crisp autumn air whispers promises of cozy evenings, there's one scent that universally evokes warmth and comfort: cinnamon apples baking. For many, this conjures images of classic apple pie, a quintessential fall dessert. However, for those navigating the world of gluten-free baking, the dream of a perfect apple pie can sometimes be marred by the dreaded "soggy bottom" or a gummy, unappealing crust. But what if there was a naturally rustic, effortlessly elegant, and unequivocally delicious solution that sidesteps these common gluten-free pie crust pitfalls? Enter the Rustic Gluten-Free Caramel Apple Galette: No More Soggy Crust – your new favorite fall treat.
My own journey into apple-cinnamon delights, inspired by a loved one's passion for everything apple, has led to countless recipes, from apple crisps to smoothie bowls. Yet, the challenge of a truly excellent gluten-free pie crust remained a persistent one. Traditional pie crusts, especially gluten-free versions, are notoriously prone to absorbing moisture from fillings, leading to an unpleasant gummy texture. Even with regular wheat flour, bakers meticulously guard against a soggy bottom. This is where the galette shines as a brilliant, forgiving, and utterly delectable alternative.
The Allure of the Rustic Gluten-Free Caramel Apple Galette
A galette, at its heart, is a free-form, rustic tart. It’s essentially a single-crust pie, where the filling is mounded in the center of a rolled-out dough, and the edges are simply folded up and over, leaving the glorious filling partially exposed. This simple structural difference is a game-changer for gluten-free baking. Unlike a deep-dish pie, a galette's shallower filling and open-faced design allow for more even heat distribution and better moisture evaporation during baking. This drastically reduces the chances of a gummy or soggy bottom, which is often the nemesis of gluten-free pie crusts when confined in a traditional pie plate.
The beauty of a galette also lies in its inherent imperfection. Where a pie might demand precise crimping and a perfectly even crust, a galette embraces a more relaxed, "countryside chic" aesthetic. Any cracks that appear in the gluten-free dough as you gently fold it (a common occurrence due to the lack of gluten structure) simply add to its charm. There's no need for stress or perfection; in fact, its rustic appearance is part of its appeal. And should any significant 'flaws' emerge, a generous drizzle of homemade caramel will artfully conceal them, adding another layer of irresistible flavor and visual delight.
Why a Galette is Your Gluten-Free Baking Champion
- Soggy Bottom Solution: Its open structure and shallower filling promote better air circulation and moisture escape, ensuring a crisp crust.
- Forgiving by Nature: No need for fancy pie plates or intricate lattice work. Cracks and uneven folds are part of its rustic charm.
- Quicker Baking: Generally, galettes bake faster than full pies, getting you to dessert sooner!
- Versatile: While perfect for fruit fillings like our caramel apple, galettes can also be savory, making them incredibly adaptable.
Crust Perfection: The Secrets to a Flaky Gluten-Free Foundation
The foundation of any outstanding galette, whether gluten-free or not, is a perfectly flaky crust. This is where attention to detail pays off immensely. The key to achieving that coveted, melt-in-your-mouth flakiness lies in two fundamental principles: using 100% cold butter and avoiding overworking the dough. For an even deeper dive into this crucial aspect, be sure to check out Secrets to a Flaky Gluten-Free Caramel Apple Galette.
Butter is Best: While some recipes might call for shortening, I wholeheartedly advocate for pure, unsalted butter. Butter not only imparts an unparalleled richness and flavor but, crucially, its water content (approximately 20%) turns into steam during baking, creating delicate, airy pockets that contribute to that desirable flaky texture. Shortening, being 100% fat, doesn't offer this same leavening effect, often resulting in a more crumbly rather than flaky crust.
The Cold Butter Technique: The butter must be kept as cold as possible. Chilled butter, cut into small cubes (about pea-sized), gets quickly worked into the flour mixture. The goal is not to fully incorporate it, but to leave visible pieces of butter. As these butter pieces melt and release steam, they push apart the layers of dough, forming distinct flakes. My preferred method is working the butter into the flour by hand. This allows you to feel the texture, ensuring you don't overmix. When using a food processor, it's easy to go too far, pulverizing the butter and leading to a tougher, less flaky result.
Hydration and Rest: After incorporating the butter, gradually add ice-cold water, just enough to bring the dough together. You want it to be cohesive but not sticky or wet. For regular wheat flour dough, careful handling at this stage is crucial to prevent over-activating the gluten, which leads to toughness. A significant advantage of baking with gluten-free flour blends is that you don't have this concern! However, chilling the gluten-free dough for at least 30 minutes (or longer) is still highly recommended. This rest period allows the fats to re-solidify, making the dough easier to roll out without it tearing, and generally improves the texture.
Crafting the Irresistible Apple-Caramel Filling
While your gluten-free crust is chilling, it's the perfect time to prepare the star of the show: the caramelized apple filling. The choice of apples is key. A blend of varieties often yields the best results, offering a balance of tartness and sweetness, and ensuring some apples hold their shape while others soften beautifully. Granny Smith apples are excellent for their tartness and firm texture, while Honeycrisp or Fuji can add sweetness and a pleasing bite. Avoid overly mealy apples that might turn to mush.
Slice your apples thinly and uniformly – this ensures even cooking. Toss them with a generous amount of warm spices like cinnamon and nutmeg, perhaps a pinch of allspice or cardamom for depth. A touch of brown sugar will enhance the caramelization, and a squeeze of lemon juice isn't just for brightness; it also helps prevent the apples from browning too quickly. For that extra layer of indulgence that elevates this galette to perfection, a homemade caramel sauce can be folded into the apple mixture before baking, or more commonly, drizzled over the baked galette. If incorporating it into the filling, ensure it's thick enough not to make the filling too watery. A touch of flour or cornstarch in the filling also helps absorb excess moisture released by the apples.
Tips for a Luscious Filling
- Apple Variety: Use a mix of firm, tart apples (like Granny Smith) and slightly sweeter, softer ones (like Honeycrisp).
- Pre-cook Option: For very juicy apples or a thicker filling, you can gently sauté the apples with spices for a few minutes before adding them to the crust. This helps them release some moisture and concentrate flavors.
- Spice it Up: Don't be shy with cinnamon, nutmeg, and perhaps a dash of ginger or cardamom.
- Caramel Integration: For an intense caramel flavor throughout, gently fold a cooled, thick caramel sauce into the apple mixture. Alternatively, save it for a show-stopping drizzle post-baking.
Assembling Your Masterpiece: From Dough to Delight
Once your dough is chilled and your filling is ready, assembling the galette is a straightforward and satisfying process. Lightly flour your work surface and rolling pin with gluten-free flour. Roll out your chilled dough into an approximate 1/8-inch thick circle. Don't worry about perfect edges or a perfectly round shape; remember, rustic is the goal.
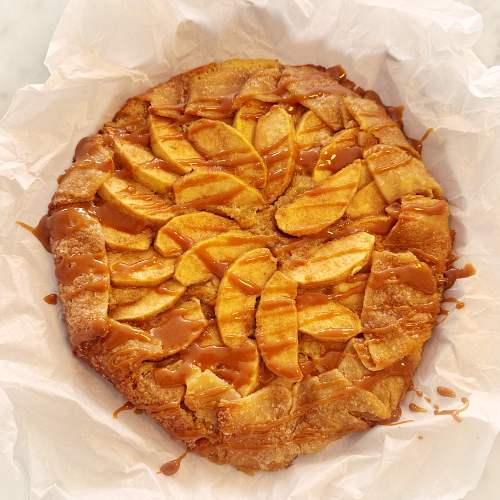
Next, spoon your prepared apple filling into the center of the dough, leaving a generous border of 4 to 5 inches clear around the edges. This border will become the folded crust. Gently lift and fold the edges of the dough up and over the filling, creating pleats as you go. Press the folds gently to seal them, but again, embrace any cracks or imperfections. An egg wash (a whisked egg with a splash of water) brushed over the folded crust will give it a beautiful golden sheen, and a sprinkle of coarse sugar will add sparkle and a delightful crunch.
Bake your gluten free caramel apple galette until the crust is deeply golden brown and the apples are tender and bubbling. The aroma filling your kitchen will be absolutely intoxicating. Once out of the oven, allow it to cool slightly on a wire rack before the grand finale: drizzling generously with a rich, velvety caramel sauce. Serve warm, perhaps with a scoop of vanilla bean ice cream or a dollop of fresh whipped cream, for an unforgettable autumnal dessert.
In conclusion, the rustic gluten-free caramel apple galette is more than just a dessert; it's a celebration of fall flavors and a testament to clever baking solutions. It liberates gluten-free bakers from the worries of soggy crusts, offering a forgiving, beautiful, and utterly delicious way to enjoy apple pie's comforting embrace. Its unpretentious elegance makes it perfect for a casual family meal or a festive gathering. Embrace its rustic charm, savor its flaky crust, and delight in the sweet, spiced apple-caramel filling – truly the perfect treat for any crisp autumn day.
